1. Introduction
What is fuzzing ?

Wikipedia[1] describes fuzzing as is “In programming and software development, fuzzing or fuzz testing is an automated software testing technique that involves providing invalid, unexpected, or random data as inputs to a computer program. The program is then monitored for exceptions such as crashes, failing built-in code assertions, or potential memory leaks.”
In reality fuzzing is simply feeding random inputs to a program in order to detect potential bugs. One of my favorite theorem used to illustrate fuzzing is the Infinite Monkey Theorem[2], which states that “a monkey hitting keys at random on a typewriter keyboard for an infinite amount of time will almost surely type any given text, including the complete works of William Shakespeare.”
In my opinion modern fuzzing really started with AFL, more specifically with the post “Pulling JPEGs out of thin air“[3] from lcamtuf, November 2014. In this post, the author explained that they managed to create valid jpeg file “out of thin air” more precisely, out of a file containing only “Hello”
As they described: after about six hours on an 8-core system, looks very unassuming: it’s a blank grayscale image, 3 pixels wide and 784 pixels tall. But the moment it is discovered, the fuzzer starts using the image as a seed – rapidly producing a wide array of more interesting pics for every new execution path

The goal of this article, is to give the reader the ability to fuzz target of their choice by their own. Using AFL++ or being enough comfortable to write its own script/software to fuzz programs. This course will not dive too deep into the shadow realm of binary exploitation and vulnerability hunting, since it’s not the actual goal. However, it might be the subject of a future article.
Why fuzzing ?
Humans make mistakes, specially when the complexity of a software is growing it becomes almost impossible for a person or even a team to understand all side effects a large and complex code-base can contains. This is why we invented automated testing in order to provide a certain level of quality in software products: Static Analysis tools and Dynamic Analysis tools.
- Static Analysis techniques example: Static Code Analysis, Code-Review, Data Flow Analysis, Control Flow Analysis, Dependency Analysis, Code Metrics, Formal Verification
- Dynamic analysis techniques example: Unit Testing, Integration Testing, Regression Testing, Fuzzing, Performance Testing, Memory Leak Detection, Profiling, Code-Coverage, Dynamic Slicing
Some fuzzer:
- AFL++ – https://github.com/AFLplusplus/AFLplusplus
- Hongfuzz – https://github.com/google/honggfuzz
- Libafl – https://github.com/AFLplusplus/LibAFL
- libfuzzer – https://llvm.org/docs/LibFuzzer.html
Fuzzing is a Dynamic Analysis technique, since it requires our program to actually run in order to test it, and eventually break it. While many solutions offer different approaches to solve the problem of bugs in software, fuzzing appears to be a very unique way to produce unpredictable bugs. Its uniqueness resides in the unconventional approach: Instead of trying to validate code, a fuzzer is trying to feed input just right enough to be accepted by the software, but at the same time also wrong enough to cause a crash or at least an undesired effect.
In this article, we will use AFL++ fuzzer. I made that choice because it is, in my opinion, one of the most reliable, modern, robust and comprehensive fuzzer you can find. The process of fuzzing an application is in itself very simple and can be illustrated as follow

We will dissect every step describe and explain how and what they do so you have a good understand of the fuzzing process in general.
Target Analysis
The strength of fuzzing relies on feeding randomized inputs to a program in order to reach potentially vulnerable functions and make them behave in a non anticipated way. In order to achieve this, a fuzzer need to know three things:
- Where it is – It is achieved by using a method called Code-Coverage. It uses program instrumentation to trace the code coverage reached by each input fed
- What to feed – In order to randomized input, the fuzzer relies on different techniques. One of the most interesting is called “mutating algorithm” where the fuzzer will combine and mutate different initial input in order to create a new generation of “randomized” inputs
- How it ends – Crash coverage or exit condition is check by using different checks and sanitization techniques, like ASAN, MSAN, etc.
Analyzing a target before running a fuzzing campaign is a crucial step that allow the user to optimize the fuzzer and ensure that the part of the program they want to test will be properly reached.
Code-Coverage and Guided fuzzing
A fuzzer can only work if it knows how far it reaches in the code tested in order to adjust its mutation algorithm, or any type of inputs randomization, and ensure that all the program has been tested. In order to achieve that it uses methods called Code-Coverage (or Guided Fuzzing). When a program is compiled it becomes a long series of assembly instruction, those instructions are very often grouped to perform a particular task and can be seen as a so-called “block”.
Wikipedia[4] state that “In compiler construction, a basic block is a straight-line code sequence with no branches in except to the entry and no branches out except at the exit.”
To illustrates this let’s compile a very simple C program on Linux:
#include <stdio.h>

char saying_hello()
{
printf("Hello Fuzzed!\n");
}

int main(int argc, char *argv[])
{
printf("Hello Fuzzer!\n");

for(int i =0; i <9; i++)
{
saying_hello();
}

return 0;
}
After compiling the program and opening it in Ghidra[5] we can see the following:
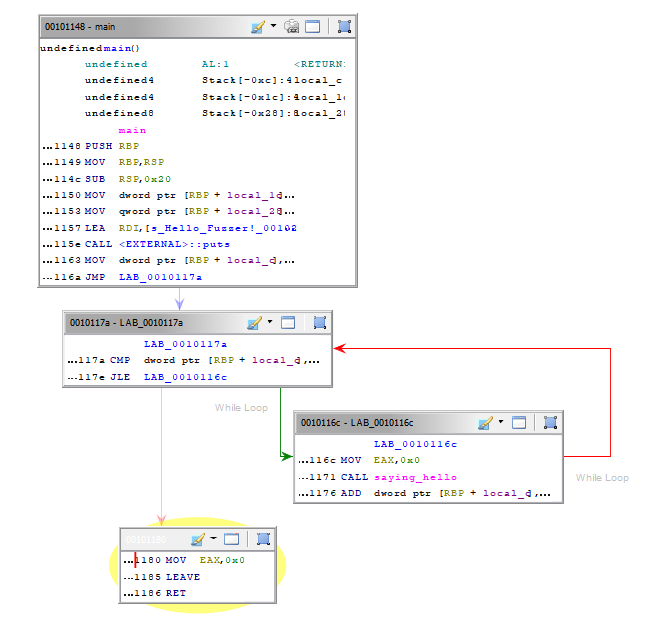
Here the disassembled code is grouped in “blocks” which represent the “flow” the program will execute. Since we asked the program to do a loop and print a message at each iteration we can see our main block, the condition check for the loop block, the call to the function saying hello and finally the last block is exiting the software. While this example is very trivial, you can imagine that in real world application there is thousands of blocks which represent a complex flow.
In the example above you can see that each block are linked by a an arrow. Those are called Edges or Branches, and as you can guess, they represent all the path a program must follow in order to be executed. The fuzzer goal to know which block as been reached or not is achieved in the next phase below: Instrumentation.
Making a visual representation of this process is called a Control Flow Graph and is very interesting topic, we won’t cover on this course. Refer to Wikipedia[6] for more info
Instrumentation
Since this course focus on AFL++, we will cover how AFL process to instrument source code. However, know that different methods exist and will be mentioned along this course. AFL++ instrumentation is done at compile time, at assembly level. The instrumentation is performed on an assembly text file.
To demonstrate AFL++ instrumentation capabilities, let’s consider a simple C program that prints “Hello World”.
#include <stdio.h>
int main(int argc, char *argv[])
{
prinf("Hello");
return 0;
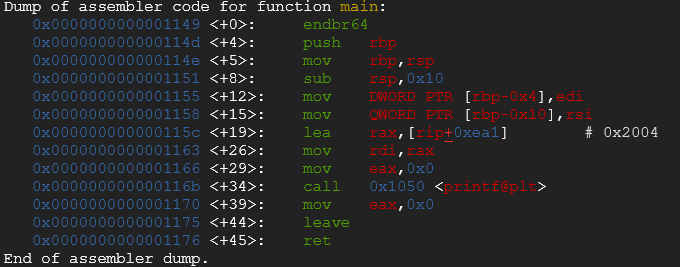
}Which compiled with gcc and disassembled in gdb looks like this:
Now let’s see this code snippet compiled and instrumented with afl-gcc and disassembled in gdb:
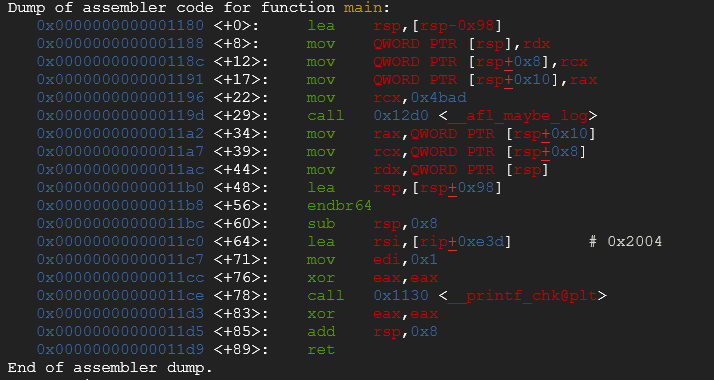
You can see that some function routine are executed then the function __AFL_MAYBE_LOG is called. It is basically one of the mechanism which allow AFL to achieve code coverage. The assembly block is instrumented in order to know if a certain point has been reached or not and improves randomized inputs based on the result of the most path found with certain type of inputs.
We won’t spend a lot of time describing every internal mechanism of AFL++, since it’s clearly an overkill for this course. However, if you want to deep dive here is a few interesting articles:
- https://mem2019.github.io/jekyll/update/2019/08/09/AFL-Fuzzer-Notes-1.html
- https://tunnelshade.in/blog/afl-internals-compile-time-instrumentation/
- https://www.core.gen.tr/posts/003-afl-internals/
Creating a corpus
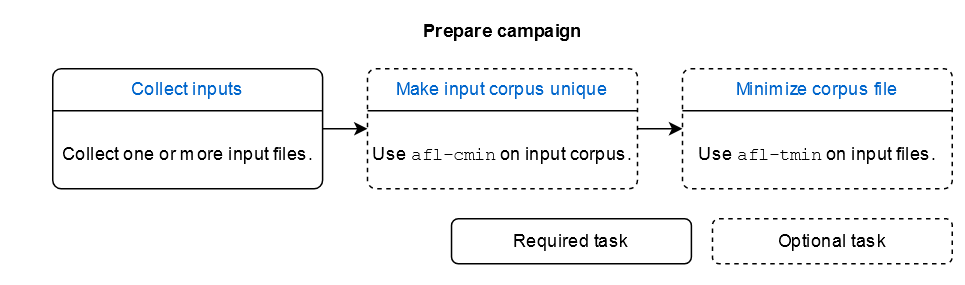
This task is pretty straight forward, or is it ? It’s obviously better to have a relatively good corpus to start your fuzzing campaign knowing that your fuzzer will to use those inputs to create the mutated one. However, if you had infinite computing power, you wouldn’t care at all about inputs, but since we don’t live in this world, we need to optimize input as much as possible in order to reach the best coverage possible. Google fuzzing team[7] stated: “A guided fuzzing engine considers an input (a.k.a. testcase or corpus unit) interesting if the input results in new code coverage (i.e., if the fuzzer reaches code that has not been reached before)” this corpus is called a Seed Corpus. In order to create an efficient corpus there is a few steps you can follow, as displayed below:
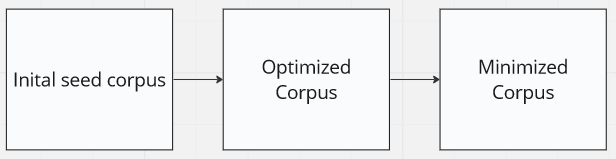
The inital seed corpus is yours to determine. If you are fuzzing a library that transform .png to .pdf maybe it’s worthy to provide .png files as input, but .jpeg might be interesting ? what about .mp3 ? It’s up to you to judge what you feel is really worthy and will reach the highest efficiency. However, AFL will probably mutate any input to an interesting one after a certain period. Providing a good initial corpus makes you gain tremendous time. AFL offers two different interesting features:
- afl-cmin [8] – Minimizes the number of inputs provided based on those that reach the most path/are the most profitable for your fuzzing campaign.
- afl–tmin [9] – Allows you to optimize the corpus you have provided. It shrinks file the maximum possible without changing the coverage.
The mutating algorithm

Understanding mutation algorithms: Mutation algorithms[10] form the backbone of fuzzing by generating mutated inputs based on existing valid inputs. They introduce controlled modifications to the original data, producing variations that can expose vulnerabilities. The primary objective of mutation algorithms is to diversify the input space while maintaining the essential characteristics of the valid input.
Mutation strategies: There are several mutation strategies employed in fuzzing, each with its own advantages and use cases. Some common mutation strategies include:
- Bit Flipping: This strategy involves randomly flipping bits within an input file, altering its contents at the binary level. By modifying individual bits, bit flipping can uncover vulnerabilities caused by unexpected interactions between program components.
- Byte Flipping: Similar to bit flipping, byte flipping focuses on altering the content of input files at the byte level. By changing the values of individual bytes, this strategy can target specific areas of interest within the input data structure.
- Arithmetic Mutation: This strategy aims to modify numerical values within the input data. It includes operations such as incrementing, decrementing, adding, subtracting, or multiplying numeric values to explore boundary conditions and exceptional scenarios.
- Interesting value: The fuzzer has a list of known “interesting” 8-, 16-, and 32-bit values to try. The stepover is 8 bits.
- Dictionary entries: Deterministic injection of dictionary terms. This can be shown as “user” or “auto”, depending on whether the fuzzer is using a user-supplied dictionary (-x) or an auto-created one. You will also see “over” or “insert”, depending on whether the dictionary words overwrite existing data or are inserted by offsetting the remaining data to accommodate their length.
- Splicing: A last-resort strategy that kicks in after the first full queue cycle with no new paths. It is equivalent to ‘havoc’, except that it first splices together two random inputs from the queue at some arbitrarily selected midpoint.
Sanitizer | Checks
- ASAN = Address SANitizer, finds memory corruption vulnerabilities like use-after-free, NULL pointer dereference, buffer overruns, etc. Enabled with
export AFL_USE_ASAN=1before compiling. - MSAN = Memory SANitizer, finds read accesses to uninitialized memory, e.g., a local variable that is defined and read before it is even set. Enabled with
export AFL_USE_MSAN=1before compiling. - UBSAN = Undefined Behavior SANitizer, finds instances where – by the C and C++ standards – undefined behavior happens, e.g., adding two signed integers where the result is larger than what a signed integer can hold. Enabled with
export AFL_USE_UBSAN=1before compiling. - CFISAN = Control Flow Integrity SANitizer, finds instances where the control flow is found to be illegal. Originally this was rather to prevent return oriented programming (ROP) exploit chains from functioning. In fuzzing, this is mostly reduced to detecting type confusion vulnerabilities – which is, however, one of the most important and dangerous C++ memory corruption classes! Enabled with
export AFL_USE_CFISAN=1before compiling. - TSAN = Thread SANitizer, finds thread race conditions. Enabled with
export AFL_USE_TSAN=1before compiling. - LSAN = Leak SANitizer, finds memory leaks in a program. This is not really a security issue, but for developers this can be very valuable. Note that unlike the other sanitizers above this needs
__AFL_LEAK_CHECK();added to all areas of the target source code where you find a leak check necessary! Enabled withexport AFL_USE_LSAN=1before compiling. To ignore the memory-leaking check for certain allocations,__AFL_LSAN_OFF();can be used before memory is allocated, and__AFL_LSAN_ON();afterwards. Memory allocated between these two macros will not be checked for memory leaks.
AFL++ sanitizer can be useful for identifying and preventing memory errors and vulnerabilities in software through dynamic analysis, improving overall code security. However, the use of sanitizers tends to slow down fuzzing and increase memory consumption because they add additional runtime checks and instrumentation, leading to increased overhead and resource usage.
White-box | Grey-box | Black-box
For now, we only talked about a certain way of fuzzing a program: compiling & instrumenting a source code based program and fuzzing it. While it’s one way of doing it, called white-box, there is different possibilities for one to run a fuzzing campaign against a target. Let’s briefly summarized those options:
- White-box: It consists in compiling and instrumenting source code that we have access too, using a tool such as AFL++ or libfuzzer to instrument the binary and then run a campaign.
- Grey-box: It’s a mix between white and black box fuzzing, basically let say that you access to the source code of an API from a program, but not the program itself. You would then use the API (instrumented, or not) in order to run your fuzzing campaign.
- Black-box: Probably one of the most difficult one (or is it?) but very interesting since it requires more setup, more research, and thus gives an edge to the researcher that is willing to put the efforts in order to actually fuzz the target.
2. Introduction to AFL++
Setting-up the lab
Many possibilities are offered to one that wants to run a fuzzing campaign, whether you own a very good computer, a VPS or even a super-computer (why not?). Since i don’t own any of those, like many, i chose to use the Google Cloud Compute Engine to create a VM. And you can even try it yourself for free since Google is actually offering 300$ for 3 month without any kind of engagement.

Reach https://console.cloud.google.com and provide your credit/card information. After providing those information you will have to activate the Compute Engine API
Once the API is enabled, you’ll be able to create a VM following those steps:
- Chose the region that suits you.
- Choose the distribution you want (i recommend Ubuntu LTS 22.04 since it posses almost every dependencies needed)
- Choose the disk size (100GO is good)
- Choose the performance. This is a tricky part since the free trial won’t let you chose whatever you want. I think most of the country can chose “E3 – 8 vCPU – 32 go RAM”
Compiling and Setting AFL++
- Download and extract the last release: https://github.com/AFLplusplus/AFLplusplus/releases
Install the following dependencies
sudo apt-get update
sudo apt-get install -y build-essential python3-dev automake cmake git flex bison libglib2.0-dev libpixman-1-dev python3-setuptools python3-pip
sudo apt-get install -y gcc-$(gcc --version|head -n1|sed 's/\..*//'|sed 's/.* //')-plugin-dev libstdc++-$(gcc --version|head -n1|sed 's/\..*//'|sed 's/.* //')-dev
sudo apt-get install -y ninja-build # for QEMU mode
pip install unicorn

# Install a specific version of LLVM:
wget https://apt.llvm.org/llvm.sh
chmod +x llvm.sh
sudo ./llvm.sh 16 # <version number>

# cd AFLplusplus folder and run the following commands
export LLVM_CONFIG=llvm-config-16
# Adding var in sudo
sudo visudo
# Append the following line to the file:
Defaults env_keep += "LLVM_CONFIG=llvm-config-16"

# Download AFL
git clone https://github.com/AFLplusplus/AFLplusplus
cd AFLplusplus
make
sudo make install
Instrumenting with AFL++
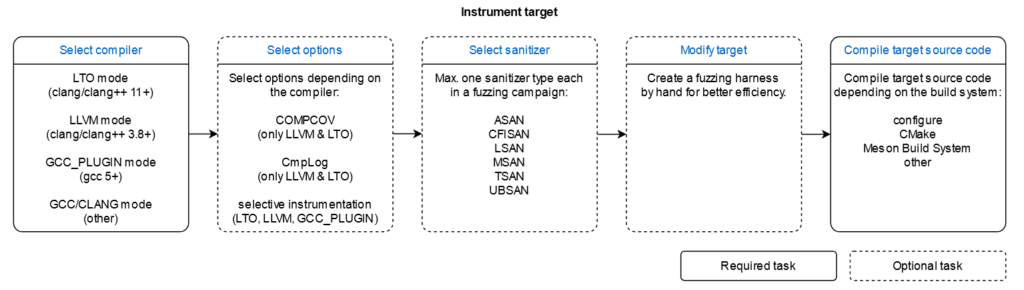
Selecting the best AFL++ compiler for instrumenting the target: AFL++ comes with a central compiler afl-cc that incorporates various different kinds of compiler targets and instrumentation options. The following evaluation flow will help you to select the best possible.
+--------------------------------+
| clang/clang++ 11+ is available | --> use LTO mode (afl-clang-lto/afl-clang-lto++)
+--------------------------------+     see [instrumentation/README.lto.md](instrumentation/README.lto.md)
    |
    | if not, or if the target fails with LTO afl-clang-lto/++
    |
    v
+---------------------------------+
| clang/clang++ 3.8+ is available | --> use LLVM mode (afl-clang-fast/afl-clang-fast++)
+---------------------------------+     see [instrumentation/README.llvm.md](instrumentation/README.llvm.md)
    |
    | if not, or if the target fails with LLVM afl-clang-fast/++
    |
    v
 +--------------------------------+
 | gcc 5+ is available            | -> use GCC_PLUGIN mode (afl-gcc-fast/afl-g++-fast)
 +--------------------------------+    see [instrumentation/README.gcc_plugin.md](instrumentation/README.gcc_plugin.md) and
                                       [instrumentation/README.instrument_list.md](instrumentation/README.instrument_list.md)
    |
    | if not, or if you do not have a gcc with plugin support
    |
    v
   use GCC mode (afl-gcc/afl-g++) (or afl-clang/afl-clang++ for clang)
Clickable README links for the chosen compiler:
- LTO mode – afl–clang-lto
- LLVM mode – afl-clang-fast
- GCC_PLUGIN mode – afl-gcc-fast
- GCC/CLANG modes (afl-gcc/afl-clang) have no README as they have no own features
Parallelism
Since we may have a multiple CPU to run our fuzzer, we can parallelized
the AFL fuzzer to share the same results folder. This will allow AFL
to know what kind of mutation has been tested.
afl-fuzz [inputs folder] [outputs folder] [Main] [instrumented binaries]
afl-fuzz [inputs folder] [outputs folder] [Secondary] [instrumented binaries]
$ afl-fuzz -i inputs/ -o ouputs/ -M Main ./software @@
$ afl-fuzz -i inputs/ -o ouputs/ -S Secondary1 ./software @@
Here is a small bash script i have written that allows you to run a fuzzing campaign like this:
./script.sh [Number of CPU] [input folder] [output folder] [target binary] [options of the binary]
#!/bin/bash

# Display help menu
display_help() {
    echo "Usage: $0 <number_of_cpu> <input_folder> <output_folder> [<options>] <binary_name> <command>"
    echo "    number_of_cpu   : Number of CPUs"
    echo "    input_folder    : Input folder"
    echo "    output_folder   : Output folder"
    echo "    options         : Options (optional)"
    echo "    binary_name     : Name of the binary"
    echo "    command         : Command"
    echo ""
    echo "Example: $0 4 input output \"\" mybinary mycommand"
    exit 1
}

# Check if the number of arguments is correct
if [[ $# -lt 5 || $# -gt 6 ]]; then
    display_help
fi

# Parse command line arguments
number_of_cpu=$1
input_folder=$2
output_folder=$3
options=""
binary_name=$4
command=$5

# Check if options are provided
if [[ $# -eq 6 ]]; then
    options=$4
    binary_name=$5
    command=$6
fi

# Run the Main command
screen -dmS Main bash -c "afl-fuzz -i $input_folder -o $output_folder -M Main ./$binary_name $command @@"


# Run Secondary commands for each CPU
for ((cpu=1; cpu<=number_of_cpu; cpu++))
do
  screen -dmS "Secondary$cpu" bash -c "afl-fuzz -i $input_folder -o $output_folder -S Secondary$cpu ./$binary_name $command @@"
done
Persistent mode
AFL++ is basically running your program with random inputs and every run come with a cost in CPU usage, however, is it really useful to reload ALL the program to test each inputs? Certainly not. This is why a persistent mode has been created and originally published in this article: https://lcamtuf.blogspot.com/2015/06/new-in-afl-persistent-mode.html
TL;DR: Instead of running a new instance each time a new input is generated, the fuzzer feeds test cases to a separate, long-lived process that reads the input data, passes it to the instrumented API, notifies the parent about successful run by stopping its own execution; eventually, when resumed by the parent, the process simply loops back to the start.
Let’s run a simple classic fuzzer against this very simple program that takes a file as argument and read its content:
#include <stdio.h>
#include <stdlib.h>

#define MAX_BUFFER_SIZE 1024

int main(int argc, char *argv[])
{
    FILE *file;
    char buffer[MAX_BUFFER_SIZE];
    const char *filename = argv[1];

    // Open the file in read mode
    file = fopen(filename, "r");
    if (file == NULL) {
        printf("Unable to open the file.\n");
        return 1;
    }

    // Read the contents of the file into the buffer
    size_t bytesRead = fread(buffer, sizeof(char), MAX_BUFFER_SIZE, file);

    // Close the file
    fclose(file);

    // Check if the file was read successfully
    if (bytesRead == 0) {
        printf("Failed to read the file.\n");
        return 1;
    }

    printf("File contents:\n%s\n", buffer);
    return 0;
}
Compiling it with AFL++ LTO and starting to fuzz it:
# Compiling with LTO
afl-clang-lto main.c -o reader

# Running fuzzer:
afl-fuzz -i in -o out ./reader @@
Here we can see the fuzzing campaign.
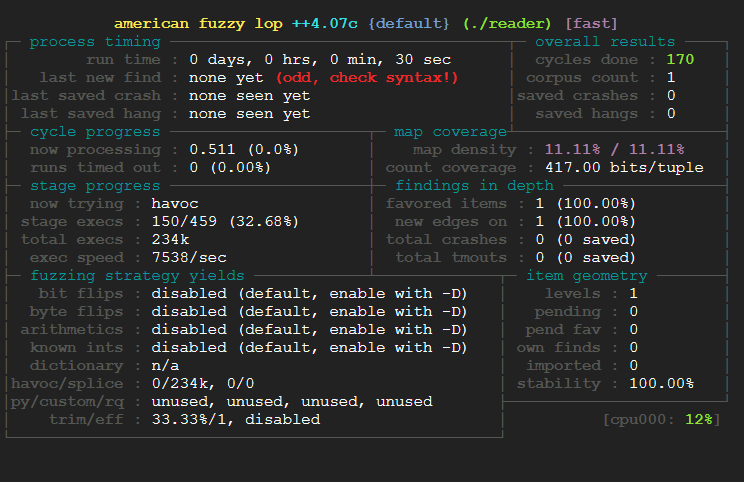
It’s quite fast since the program is almost doing nothing, and no finds are found because well there is nothing to really explore. However, let’s implement the persistent mode as describe in the AFL documentation:
#include <stdio.h>
#include <stdlib.h>

#define MAX_BUFFER_SIZE 1024

// Adding AFL_FUZZ_INIT
__AFL_FUZZ_INIT();

/* To ensure checks are not optimized out it is recommended to disable
   code optimization for the fuzzer harness main() */
#pragma clang optimize off
#pragma GCC            optimize("O0")

int main(int argc, char *argv[])
{

    // Adding AFL_INIT and buf;
    __AFL_INIT();
   unsigned char *buf = __AFL_FUZZ_TESTCASE_BUF;

    // Starting AFL_LOOP
while (__AFL_LOOP(100000)) {

    FILE *file;
    char buffer[MAX_BUFFER_SIZE];
    const char *filename = buf; // using buf instead of argv[1]

    // Open the file in read mode
    file = fopen(filename, "r");
    if (file == NULL) {
        printf("Unable to open the file.\n");
        return 1;
    }

    // Read the contents of the file into the buffer
    size_t bytesRead = fread(buffer, sizeof(char), MAX_BUFFER_SIZE, file);

    // Close the file
    fclose(file);

    // Check if the file was read successfully
    if (bytesRead == 0) {
        printf("Failed to read the file.\n");
        return 1;
    }
    printf("File contents:\n%s\n", buffer);
    } // Closing the loop;
    return 0;
}
Let’s compile it, run the fuzzer and see the speed now:
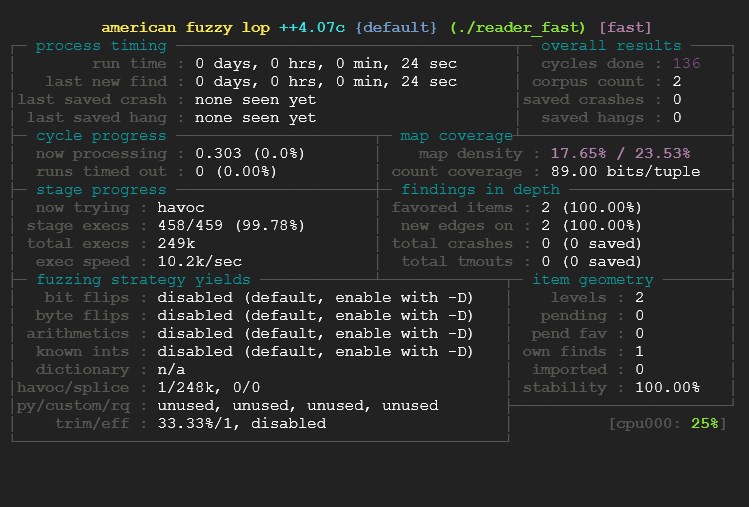
We went from 7500 exec/sec to 10.200 exec/sec. This is a very good improvement in speed, knowing that our initial program was very fast the difference isn’t that big, however if you fuzz a real target you can gain from 1x to 20x time speed, which parallelized and run for a long period is an gigantic difference.
AFL doc state that: “Basically, if you do not fuzz a target in persistent mode, then you are just doing it for a hobby and not professionally 🙂 “
Persistent mode is described in detail here: https://github.com/AFLplusplus/AFLplusplus/blob/stable/instrumentation/README.persistent_mode.md
Partial instrumentation
When building and testing complex programs where only a part of the program is the fuzzing target, it often helps to only instrument the necessary parts of the program, leaving the rest uninstrumented. This helps to focus the fuzzer on the important parts of the program, avoiding undesired noise and disturbance by uninteresting code being exercised.
TL;DR: You just need to specify the part of the code you want to be covered by the fuzzer. Pros is that you will gain from slight to tremendous amount of compute time. Cons is that, since you select manually the “zone” you want to fuzz, you can miss opportunity.
Usage is quite straight forward:
__AFL_COVERAGE(); // <- required for this feature to work.
__AFL_COVERAGE_ON(); – Enable coverage from this point onwards.
__AFL_COVERAGE_OFF(); – Disable coverage from this point onwards.
Process is detailed here: https://github.com/AFLplusplus/AFLplusplus/blob/stable/instrumentation/README.instrument_list.md
3. Pratice – White box
In reality, there is a numerous amount of options and details you can set to start a fuzzing campaign with AFL. Please refer to the diagram below and the suggested workflow from AFL++
More info – https://github.com/AFLplusplus/AFLplusplus/tree/stable/docs#readme

Chose a target
This is one of the question i have been asked a lot, and asked myself a lot too. It really depends on what you are aiming to do, if money interest you then you should go on different bug bounty programs and look at which target might suits you, otherwise if you look for reputation/CVE you should check for largely open-source target.
For this course, we are going to reproduce a vulnerability found in VIM by the Researcher Dhiraj Mishra CVE-2019-20079 It’s a vulnerability that has been discovered by fuzzing with AFL++ and there is even an exploit for it. His blog post: https://www.inputzero.io/2020/03/fuzzing-vim.html
Analyse a target and create a corpus

First step when you chose a target is to understand what the program does, how it works basically and what kind of inputs it takes. VIM is an extremely famous a text editor largely used in the dev community and known for not being possible to exit without very advanced knowledge. Find more info about vim here: https://www.vim.org/about.php
Since it’s a software designed to edit file, it’s it is a quite straightforward process to fuzz it. We just need to compile and instrument the target, then produce a corpus and run the fuzzer with the proper settings against it.
You can download a vulnerable version of git following those steps:
# You can obtain Vim for the first time with:
git clone https://github.com/vim/vim.git

# CD into the Vim directory
cd vim

# Rolling back to a vulnerable version
git checkout v8.1.2122
Analyze previous crash
In the crash found by the researcher we can see the reason/type of crash provoked by the file as well as its content. Now the most interesting part is to conduct a root cause analysis in order to determine why this crash happened and what function is vulnerable/buggy in the target. Firstval, since Vim has patched the problem, let’s look at the commit:
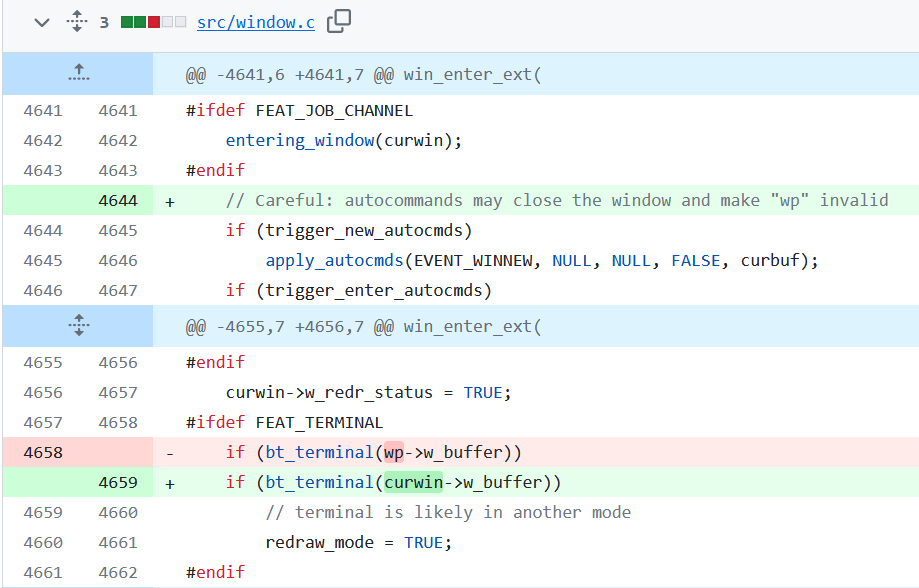
Here is the commit change on the window.c file from VIM to fix the bug. We can see that they removed the line if(bt_terminal(wp->w_buffer)) to replace it by if(bt_terminal(curwin->w_buffer)) which fix the Use-After-Free vulnerability
Now let’s give a check at the crash_file provided by the researcher, feed as input for our Vim:

You can see that the problem reside into buffer.c line 5307 which resulted in a segmentation fault.
Instrumenting the target
AFL++ 4.07 offers different instrumentation option and sanitizer. Here they are resumed below
However, during this example we are going to use afl-clang-fast and afl-clang-fast++ to instrument the binary since this is what the researcher initially used to find the bug.
Download vim, extract it, cd into the vim folder then run the command:
# Configure VIM to be compiled with AFL options
CC=afl-clang-fast CXX=afl-clang-fast++ ./configure --with-features=huge --enable-gui=none

# Compiling
make -j4
Prepare campaign
During his test the researcher used a dictionary: regexp.dict. Custom dictionaries can be added at will. They should consist of a reasonably-sized set of rudimentary syntax units that the fuzzer will then try to clobber together in various ways. Snippets between 2 and 16 bytes are usually
the sweet spot. Read more: https://github.com/google/AFL/blob/master/dictionaries/README.dictionaries
While being very useful and interesting, the LTO mode (newest version of AFL++) with LLVM is automatically building dictionary from the inputs provided. Thus we won’t deep dive into creating dictionary ourself.
# cd into the src folder
cd src/

# Creating corpus folder and 2 basic corpus file
mkdir corpus output
echo "a*b\+\|[0-9]\|\d{1,9}" > corpus/1 ; echo "^\d{1,10}$" > corpus/2

# Adding regex dictionnary
wget https://raw.githubusercontent.com/vanhauser-thc/AFLplusplus/master/dictionaries/regexp.dict
Fuzzing the target
# While fuzzing, fuzz it on ram file system to avoid making too much I/O something like:
sudo mount -t tmpfs -o size=6g tmpfs /home/afl-fuzz-user/afl-fuzz.

# Running the fuzzing campaign
afl-fuzz -m none -i corpus -o output ./vim -u NONE -X -Z -e -s -S @@ -c ':qa!'
The above options used –u NONE and -X is to speed up vim startup. Options -e -s are used to make vim silent and to avoid ‘MORE’ prompt which could block VIM, the option -Z disables the external commands.
Now it’s time to be patient. The fuzzing process might vary drastically from one system to another, if you have a very powerful setup you might reach the bug quite easily otherwise it can takes some times. On a Google Cloud Compute E3 8vCore 32go RAM it takes a few hours.
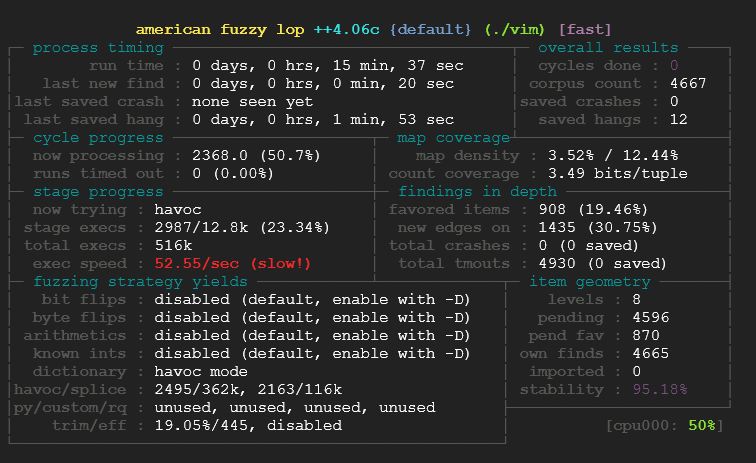
What is happening there? Well it’s pretty simple here is what those field correspond to:
- 1.) Process timing: This section is fairly self-explanatory: it tells you how long the fuzzer has been running and how much time has elapsed since its most recent finds. This is broken down into “paths” (a shorthand for test cases that trigger new execution patterns), crashes, and hangs.
- 2.) Overall Results: The first field in this section gives you the count of queue passes done so far – that is, the number of times the fuzzer went over all the interesting test cases discovered so far, fuzzed them, and looped back to the very beginning.
- 3.) Cycle Progress: This box tells you how far along the fuzzer is with the current queue cycle: it shows the ID of the test case it is currently working on, plus the number of inputs it decided to ditch because they were persistently timing out.
- 4.) Map coverage: The section provides some trivia about the coverage observed by the instrumentation embedded in the target binary.
- 5.) Stage Progress: This part gives you an in-depth peek at what the fuzzer is actually doing right now. It tells you about the current stage
- 6.) Finding in depth: This gives you several metrics that are of interest mostly to complete nerds. The section includes the number of paths that the fuzzer likes the most based on a minimization algorithm baked into the code.
- 7.) Fuzzing Strategy Yield: This is just another nerd-targeted section keeping track of how many paths we have netted, in proportion to the number of execs attempted, for each of the fuzzing strategies discussed earlier on.
- 8.) Path Geometry: The first field in this section tracks the path depth reached through the guided fuzzing process. In essence: the initial test cases supplied by the user are considered “level 1”. The test cases that can be derived from that through traditional fuzzing are considered “level 2”; the ones derived by using these as inputs to subsequent fuzzing rounds are “level 3”; and so forth.
You can find more information about it here: https://afl-1.readthedocs.io/en/latest/user_guide.html#status-screen
What is interesting when you run a campaign on a target that contains a known CVE is that you can test if yes or not the vulnerability is present. In order to do that i simply download the file the researcher has provided in his blog https://dl.packetstormsecurity.net/1910-exploits/vim812135-useafterfree.tgz then i use the crash test file against my instrumented ./vim and check the result:

Now that we have confirm our program is actually crashing as intended, let’s run the campaign and put in pratice what we learned before and run this script in parallel. Since my machine has 8 cpu i can easily run 8 fuzzer (math is mathing) so i wrote this very simple script for you to run this tasks in parallel:
screen -dmS Main bash -c "afl-fuzz -m none -i corpus -o output -M Main  ./vim -u NONE -X -Z -e -s -S @@ -c ':qa!'";
screen -dmS Secondary1 bash -c "afl-fuzz -m none -i corpus -o output -S Secondary1 ./vim -u NONE -X -Z -e -s -S @@ -c ':qa!'";
screen -dmS Secondary2 bash -c "afl-fuzz -m none -i corpus -o output -S Secondary2 ./vim -u NONE -X -Z -e -s -S @@ -c ':qa!'";
screen -dmS Secondary3 bash -c "afl-fuzz -m none -i corpus -o output -S Secondary3 ./vim -u NONE -X -Z -e -s -S @@ -c ':qa!'";
screen -dmS Secondary4 bash -c "afl-fuzz -m none -i corpus -o output -S Secondary4 ./vim -u NONE -X -Z -e -s -S @@ -c ':qa!'";
screen -dmS Secondary5 bash -c "afl-fuzz -m none -i corpus -o output -S Secondary5 ./vim -u NONE -X -Z -e -s -S @@ -c ':qa!'";
screen -dmS Secondary6 bash -c "afl-fuzz -m none -i corpus -o output -S Secondary6 ./vim -u NONE -X -Z -e -s -S @@ -c ':qa!'";
screen -dmS Secondary7 bash -c "afl-fuzz -m none -i corpus -o output -S Secondary7 ./vim -u NONE -X -Z -e -s -S @@ -c ':qa!'";
To run the script it’s really simple you can just do:
# Giving permission to the script
chmod +x script.sh
./script.sh
AFL++ is including a feature “afl-whatsup” which you specify the shared output folder used by your fuzzer and display results.
# Display the results in the shared output folder
afl-whatsup output/
This will display a summary stat like that:
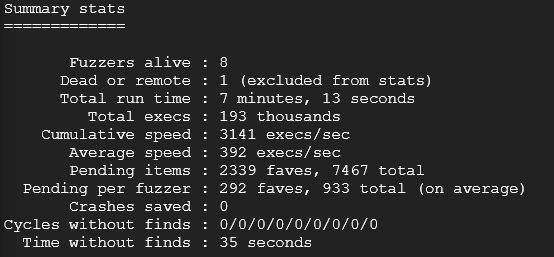
Analyze result of our campaign
After letting the fuzzer run i came back to the good news:
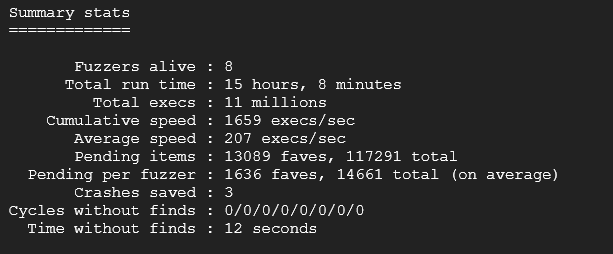
This means that the fuzzer has caught a unique crash in the execution of our program. AFL++ save the crash-test file in the output folder you have chose before starting the fuzzing campaign. Let’s analyse this crash test file:

Each of those entries represent a file that crashes this particular Vim version. If you look at it you can see that the second field is “sig:11“, in Linux the signal is a technique used to tell if the program exited correctly: 0 means OK, anything else is pretty much bad. 11 Means segmentation fault, which is quite bad. More info about Linux signals[11] here: https://www-uxsup.csx.cam.ac.uk/courses/moved.Building/signals.pdf
Let’s run vim inside gdb to analyze the crash:
 # Running GDB
 $ gdb --args ./vim -u NONE -X -Z -e -s -S output/Secondary1/crashes/id:000000,sig:11,src:014903,time:6786383,execs:1343354,op:havoc,rep:4
We can see below that GDB is returning “Segmentation fault” and the source of this issue seems to be ex_cmds.c line 263

That’s very interesting because it is not at all what the researcher found in the first place, did we find another vulnerability ? Let’s check it against the latest vim version:
# Downloading and compiling vim
git clone https://github.com/vim/vim.git
cd vim
CC=afl-clang-fast CXX=afl-clang-fast++ ./configure --with-features=huge --enable-gui=none
make -j4

# Testing the crash
./vim -u NONE -X -Z -e -s -S ../../../crash_1
Unfortunately nothing happen, the bug doesn’t seem to be present in latest VIM version. However, in previous crash found by the research, it was a totally different bug that then one we just just found. Let’s try to run it inside gdb:
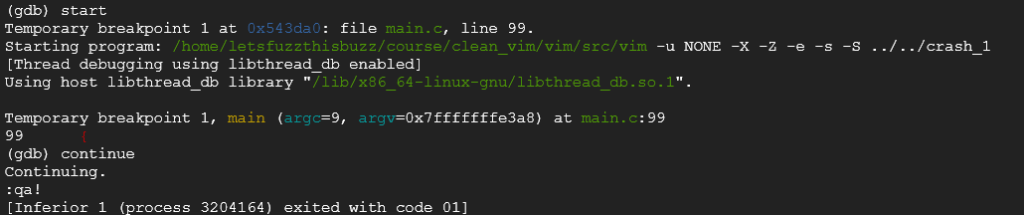
We can see that latest version of vim doesn’t crash with this sample anymore. However, it appears to be a totally different bug than the previously found one which is quite.. encouraging, no?
What now ?
Time for you to have some fun and run a fuzzing campaign like a professional with latest features of AFL++ which mean using LTO, persistent mode, partial instrumentation, optimized corpus and parallelism
Compiling with LTO
# Inside vim folder
CC=afl-clang-lto CXX=afl-clang-lto++ RANLIB=llvm-ranlib-16 AR=llvm-ar-16 AS=llvm-as-16 LD=afl-ld-lto ./configure --with-features=huge --enable-gui=none
make -j4
You can use built-in feature of afl to triage crash as follow:
afl-fuzz -C -i output/crashes/ -o triage_output ./vulnerabile_binary [OPTIONS] Further reading
- An excellent tutorial has been written by Antonio Morales: Fuzzing 101
References
- [1] Wikipedia article – https://en.wikipedia.org/wiki/Fuzzing
- [2] Infinite Monkey Theorem – https://en.wikipedia.org/wiki/Infinite_monkey_theorem
- [3] Pulling jpeg out of thin air – https://lcamtuf.blogspot.com/2014/11/pulling-jpegs-out-of-thin-air.html
- [4] A Basic Block – https://en.wikipedia.org/wiki/Basic_block
- [5] Ghidra – https://ghidra-sre.org/
- [6] Control Flow Graph – https://en.wikipedia.org/wiki/Control-flow_graph
- [7] Google Fuzzing – https://chromium.googlesource.com/chromium/src/+/main/testing/libfuzzer/efficient_fuzzing.md
- [8] cmin – https://www.mankier.com/8/afl-cmin
- [9] tmin – https://www.mankier.com/8/afl-tmin
- [10] The fuzzing book – https://www.fuzzingbook.org/
- [11] Linux – Signals – https://www-uxsup.csx.cam.ac.uk/courses/moved.Building/signals.pdf