Author: 2ourc3
Introduction
Today we are gonna dive into grey-box fuzzing by testing closed source Windows binaries. This type of fuzzing allows one to fuzz a target without having access to its source code. Why doing such type of fuzzing? Since it requires more setup and advanced skills, less people are prone to look for vulnerabilities / being able to find them. Thus it enlarge the possibilities for you, vulnerability researcher, to find new undiscovered vulns.
To achieve this we will need to overcome several challenges:
- Instrumenting the code.
- Find a relevant function to fuzz.
- Modifying/patching the binary to make it fuzzable.
There is plenty of solutions available to run fuzzing campaign on Windows binaries, however we gonna solely focus on WinAFL in this chapter. WinAFL offers three type of instrumentation:
- Dynamic instrumentation via DynamoRIO – Dynamic instrumentation is modifying the instruction of a program while the program is running.
- Static instrumentation via Syzygy – Static instrumentation is modifying the instruction of a program at compilation time.
- Hardware Tracing via Intel PTrace – Hardware feature that asynchronously records program control flow.
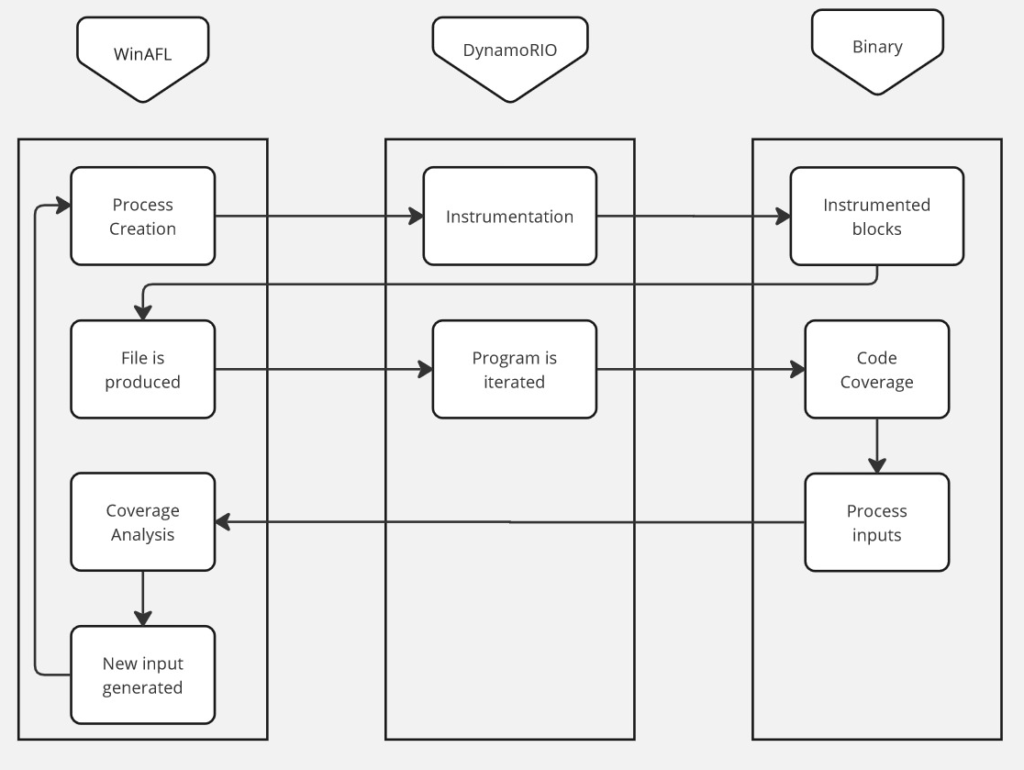
While each method offer their own pros and cons, we will focus today on using Dynamic Instrumentation via DynamoRIO. See below a description of the workflow WinAFL + DynamoRIO will execute while fuzzing your target binary.
Compiling WinAFL
- If you are building with DynamoRIO support, download and build DynamoRIO sources or download DynamoRIO Windows binary package from https://github.com/DynamoRIO/dynamorio/releases
- If you are building with Intel PT support, pull third party dependencies by running
git submodule update --init --recursivefrom the WinAFL source directory - Open Visual Studio Command Prompt (or Visual Studio x64 Win64 Command Prompt if you want a 64-bit build). Note that you need a 64-bit winafl.dll build if you are fuzzing 64-bit targets and vice versa.
- Go to the directory containing the source
- Type the following commands. Modify the -DDynamoRIO_DIR flag to point to the location of your DynamoRIO cmake files (either full path or relative to the source directory).
For a 32-bit build:
mkdir build32
cd build32
cmake -G"Visual Studio 16 2019" -A Win32 .. -DDynamoRIO_DIR=..\path\to\DynamoRIO\cmake -DINTELPT=1
cmake --build . --config Release
For a 64-bit build:
mkdir build64
cd build64
cmake -G"Visual Studio 16 2019" -A x64 .. -DDynamoRIO_DIR=..\path\to\DynamoRIO\cmake -DINTELPT=1
cmake --build . --config Release
Build configuration options
The following cmake configuration options are supported:
-DDynamoRIO_DIR=..\path\to\DynamoRIO\cmake– Needed to build the winafl.dll DynamoRIO client-DINTELPT=1– Enable Intel PT mode. For more information see https://github.com/googleprojectzero/winafl/blob/master/readme_pt.md-DUSE_COLOR=1– color support (Windows 10 Anniversary edition or higher)-DUSE_DRSYMS=1– Drsyms support (use symbols when available to obtain -target_offset from -target_method). Enabling this has been known to cause issues on Windows 10 v1809, though there are workarounds, see #145
Find a target
Finding the right target to fuzz isn’t always easy. It’s all about finding a software complex enough to be worthy being tested but accessible enough for you to understand what to fuzz and which features is interesting.
One good strategy is to target software that are known to contains vulnerability and are reactive in a disclosure program, a good way to find such is to look on the website of Zero Day Initiative.
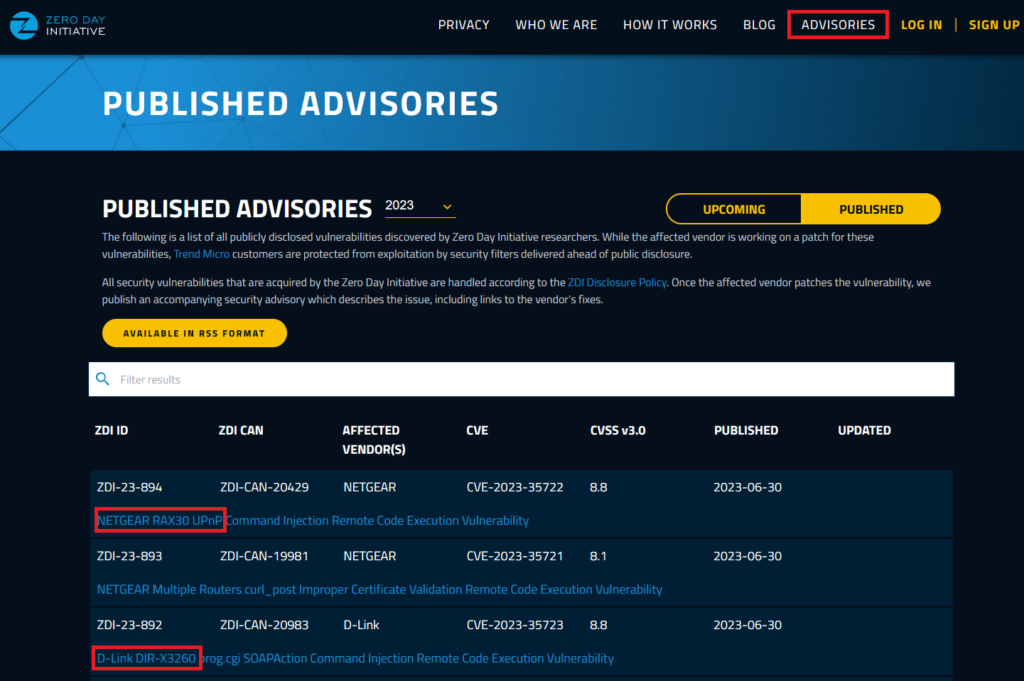
In this section there is previously disclosed bug which can give you a good broad view of what programs are tested and their responsiveness. Here we see that vulnerability were disclosed for Netgear and D-link product, there is tons of previously disclosed vulnerabilities on this website, up to you to search through it and find the target that interest you the most.
Since fuzzing a complex target required some advanced skills such as Reverse Engineering, understand large code-base etc, we will focus on a Binary Target i specially created for the purpose of this course. It is a vulnerable file reader, it takes a file as entry, copy its content in a buffer, and close the file.
You can download the file here, password: “bushido” https://drive.google.com/file/d/1c-cOuzYbC-gOFW91a2EHKNpZTiPrVdBP/view?usp=sharing
Patching binary to allow fuzzing
Unfortunately numerous software uses some kind of dialog box control flow where user is prompted to answer question before executing a certain task like “This file already exist. Do you want to overwrite it ?” etc.
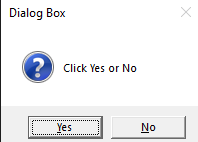
This make the fuzzing process impossible since it will require the user to interact with dialog box, which will prevent the fuzzer to run normally. This is why we are now looking on how to improve/patch a binary in order to make it fuzzable!
Download and install Ghidra, start the application then create a project directory and project. Import vulnerable_reader.exe click on “Options..” and enable “Load Local Libraries From Disk”

After loading the libraries you can start the process of reversing by pressing enter or double click the file name, it will prompt a dialog box”Analyze” which you can configure.
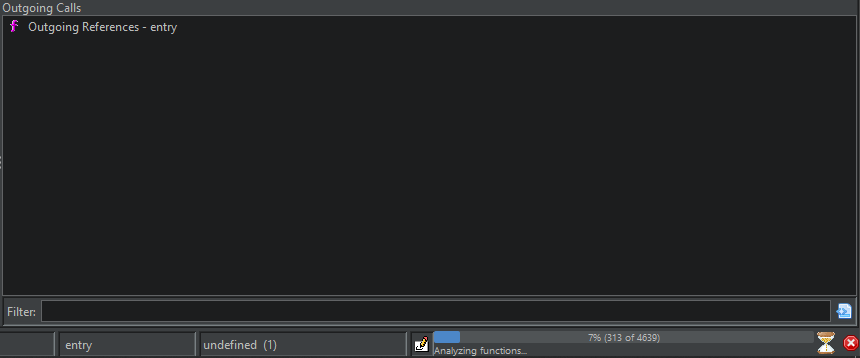
For this exercise, no need to change it, however, i invite you to explore the options available and their capacities. After clicking OK you’ll see the disassembly code of the binary display, you’ll need to wait a bit that Ghidra analyzes the entire binary, you can find the progress bar at the bottom-right of the screen:
If you save your program after the analysis, you wont need to analyze it again in the future. This binary is quite small, but keep in mind it wont always been the case. I encourage you to save the analyzed program as a copy just after the analysis is performed.
Now that analysis is performed we can see through the software. Investigate this binary is gonna be quite easy since we already know one string used in the dialog box, let’s open Search > Program text then enter “You clicked Yes!” in “fields” enable “all fields” and in block enable “all blocks” then click “Search All”and double click the first finding in the results.
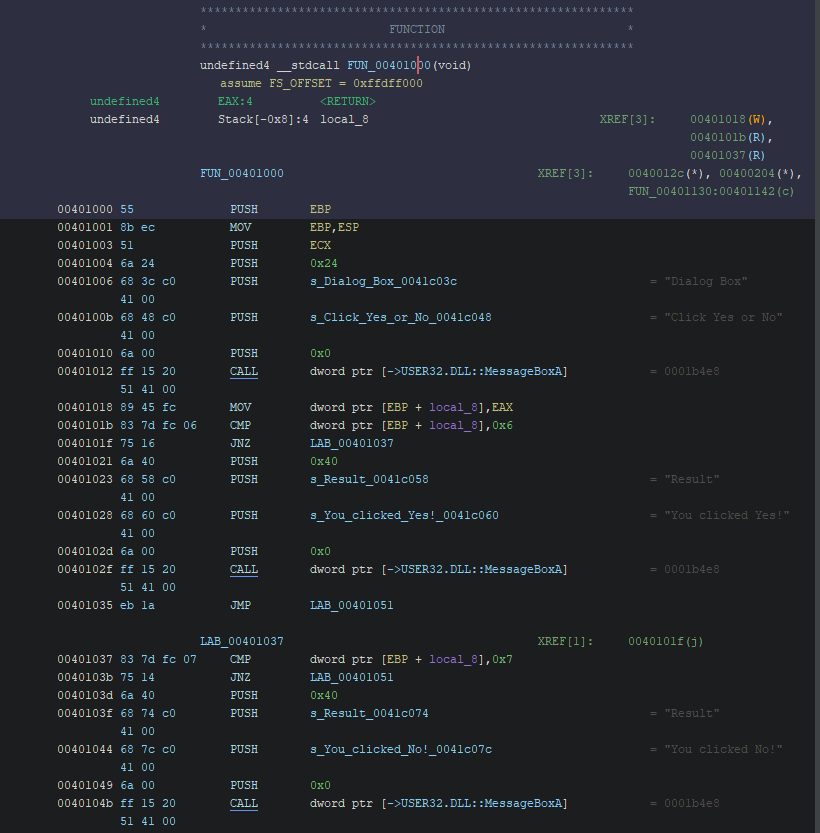
We can see there is two options possible, either the function allows you to select yes and close or no and close. There is no real purpose this function, however, it prevent the program to continue its flow before you click and consequently prevent you to fuzz it.
One interesting information to look at are the XREFS, which correspond at the emplacement where this function (FUN_00401000) is called. Here we can see that the function is called by FUN_00401130, let’s double click and see what this function is.
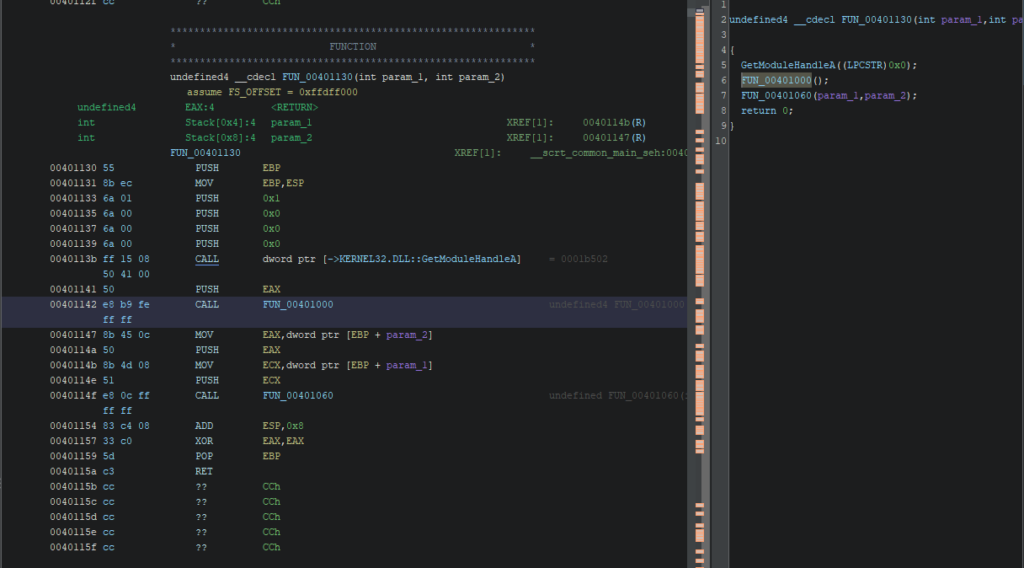
It seems that this function is basically our main function. It takes two parameters as arguments and pass it to the second function. The first function is the one responsible for the dialog box.
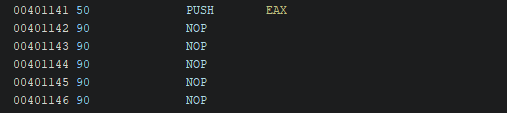
Let’s replace the instruction “CALL FUN_00401000” by a NOP instruction

As you can see, there is now a bunch of “??” following our instruction. It’s because the initial instruction was larger than the NOP instruction (in hex: 90) so we need to replace the “??” by NOP instructions too to respect the padding. More info https://en.wikipedia.org/wiki/Data_structure_alignment
The result must look like this:
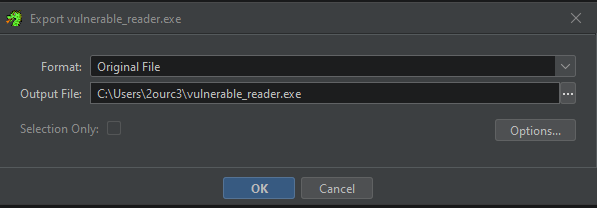
Now export the program as PE file, click File > Export Program then select Original File and put the right path :
Let’s run the program and see if the dialog box happens again:

Bravo! Keep in mind that most programs have way more complex interactions required, and this course isn’t about Reverse Engineering. However a big aspect of running successful fuzzing campaign consist in removing what makes the fuzzer slower, and GUI is a big part of that. You should definitely have some interest in RE if you want to pursue research in fuzzing.
Function offset
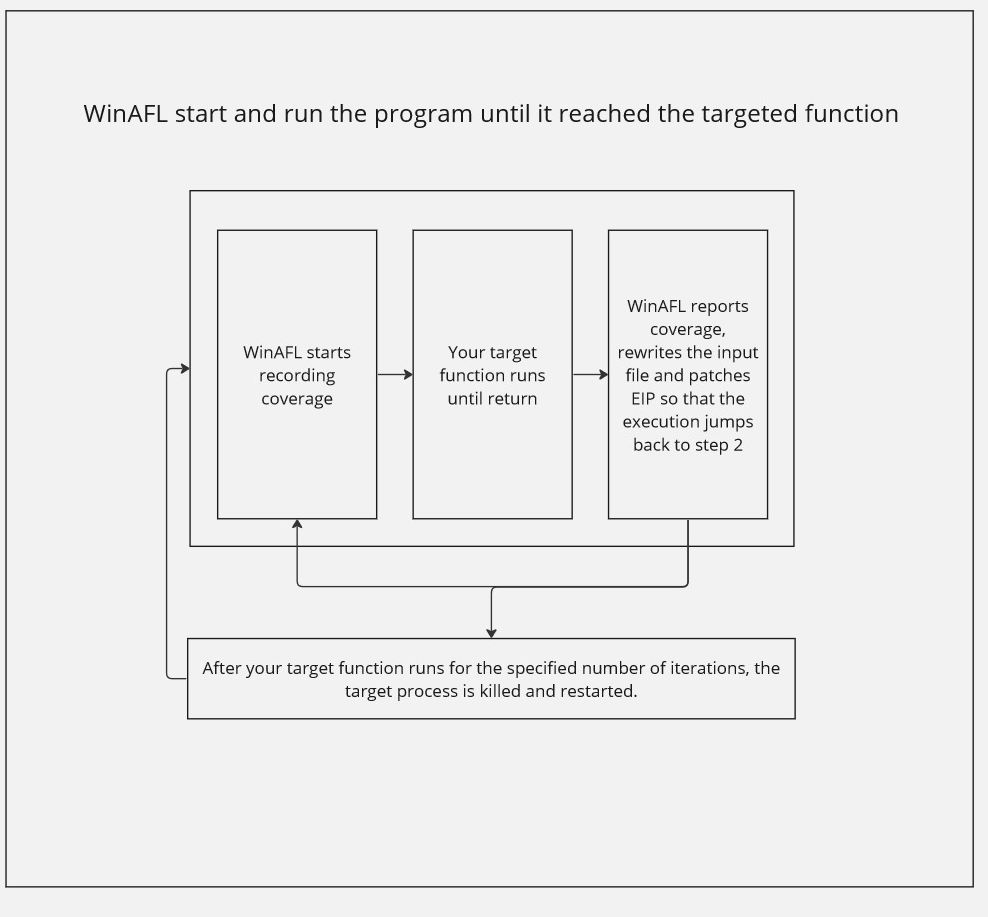
WinAFL uses a technique to optimize the fuzzing process by mitigating the slow execution time associated with the exec syscall and the typical process startup procedure. Instead of re-initializing the target program for every fuzzing attempt, it employs a strategy inspired by the concept of a fork server.
The basic idea is to execute the program until reaching the desired fuzzing point by supplying randomized inputs. By employing this approach, each subprocess handles only a single input, effectively circumventing the overhead associated with the exact syscall operation.
As a result, when fuzzing a program with WinAFL, if the desired fuzzing point is reached during the third call, for example, the performance remains unaffected. However, the significant advantage lies in reducing the overhead of fuzzing throughout the entire program, leading to more efficient and effective fuzzing sessions.
Here is a diagram that illustrate this process.
How to select a target function
The target function should do these things during its lifetime:
- Open the input file. This needs to happen within the target function so that you can read a new input file for each iteration as the input file is rewritten between target function runs.
- Parse it (so that you can measure coverage of file parsing)
- Close the input file. This is important because if the input file is not closed WinAFL won’t be able to rewrite it.
- Return normally (So that WinAFL can “catch” this return and redirect execution. “returning” via ExitProcess() and such won’t work)
How to find the virtual offset of the function
- Static analysis with tools like Ghidra and radare2
- Debugging the code with WinDBG or x64dbg (Setting up breakpoints and analyzing the parameters of functions at runtime)
- Use auxiliary tools like API monitors, process monitors, and coverage tools like ProcMon
Find offset via Static Analysis with Ghidra
The binary contains some strings, one of them is “Failed to open file”, let’s click the Search menu then click “Program Text” and look for this sentence:
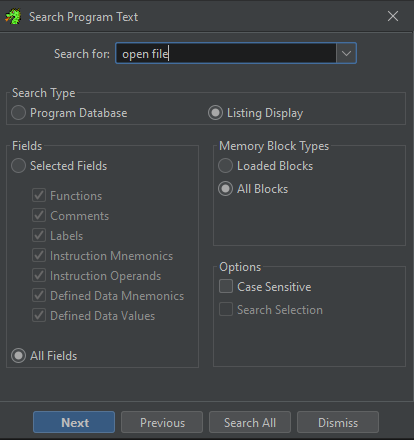
Let’s click search all and examine the result:
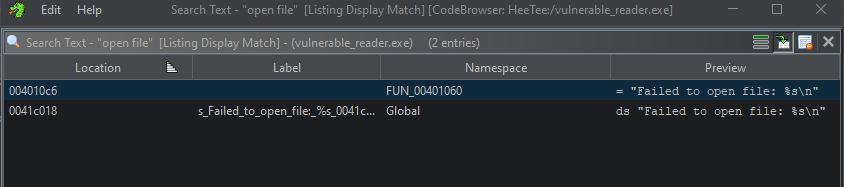
Let’s double click the first occurrence in the Namespace FUN_00401060
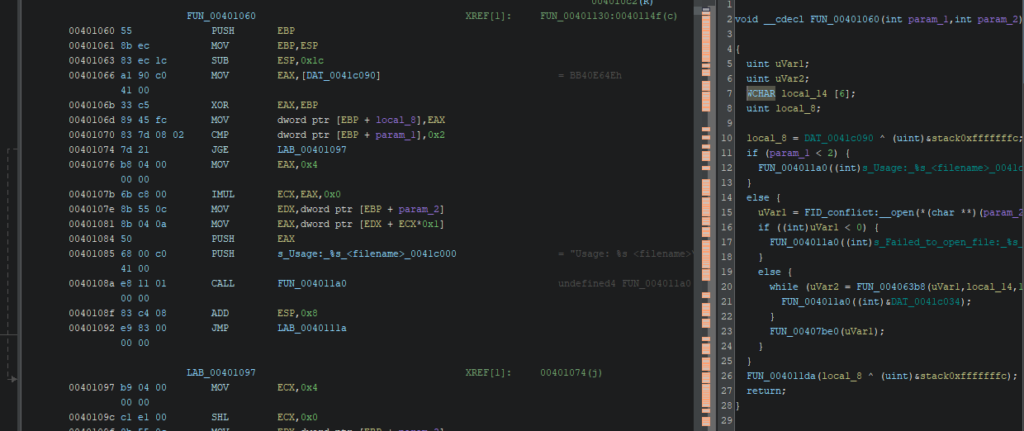
Remember that the execution flow we are looking for is: Open file > Read it > Close the File > return to normal execution. Let’s investigate if this flow happens in the pseudo code of the function. Simplified it give us:
void __cdecl FUN_00401060(int argc, int argv)
{
  uint openResult;
  uint readResult;
  WCHAR fileContentBuffer[6]; // Buffer to store file content
  uint localVariable;

  localVariable = DAT_0041c040 ^ (uint)&stack0xfffffffc;

  if (argc < 2) {
    FUN_00401130((int)s_Usage:_%s_<filename>_0041c000); // Print usage message
  }
  else {
    openResult = FID_conflict:__open(*(char **)(argv + 4), 0x8000); // Open file specified in argv[1]

    if ((int)openResult < 0) {
      FUN_00401130((int)s_Failed_to_open_file:_%s_0041c018); // Print error message if file opening fails
    }
    else {
      while (readResult = FUN_00406348(openResult, fileContentBuffer, 10), 0 < (int)readResult) {
        FUN_00401130((int)&DAT_0041c034); // Print file contents
      }
      FUN_00407b70(openResult); // Close the file
    }
  }
  FUN_0040116a(localVariable ^ (uint)&stack0xfffffffc); // Some additional function call
  return;
}
Sound like a match! Now let’s find the offset of this function. It’s pretty straight forward, let’s right-click on the function and show byte. We see the address of the function is 0x00401060 and the base address is 0x0040000 so the function offset is 0x01060
Ghidra CheatSheet: https://ghidra-sre.org/CheatSheet.html
Prepare environment for fuzzing
Fuzzing binary is a quite resource-demanding tasks, here is a few things you can do to prepare your environment to run a fuzzing campaign smoothly:
- Disabling automatic debugging
- Disabling AV scanning
Optimization
Having a nice corpus of inputs is a very important aspect of fuzzing. WinAFL offers two options to optimize your corpus with c-min.py. Examples of use:
- Typical use
winafl-cmin.py -D D:\DRIO\bin32 -t 100000 -i in -o minset -covtype edge -coverage_module m.dll -target_module test.exe -target_method fuzz -nargs 2 — test.exe @@ - Dry-run, keep crashes only with 4 workers with a working directory:
winafl-cmin.py -C –dry-run -w 4 –working-dir D:\dir -D D:\DRIO\bin32 -t 10000 -i in -i C:\fuzz\in -o out_mini -covtype edge -coverage_module m.dll -target_module test.exe -target_method fuzz -nargs 2 — test.exe @@ - Read from specific file
winafl-cmin.py -D D:\DRIO\bin32 -t 100000 -i in -o minset -f foo.ext -covtype edge -coverage_module m.dll -target_module test.exe -target_method fuzz -nargs 2 — test.exe @@ - Read from specific file with pattern
winafl-cmin.py -D D:\DRIO\bin32 -t 100000 -i in -o minset -f prefix-@@-foo.ext -covtype edge -coverage_module m.dll -target_module test.exe -target_method fuzz -nargs 2 — test.exe @@ - Typical use with static instrumentation
winafl-cmin.py -Y -t 100000 -i in -o minset — test.exe @@
winafl-cmin.py can take a while to run, so be patient.
Running a campaign
We have patched the binary to make it fuzzable, found the offset of the function we want to test, now let’s have fun and run the fuzzer! WinAFL offers different options, let’s enumerate them:
t– Timeout per fuzzing iteration. If not completed WinAFL restart the program;D– DynamoRIO pathcoverage_module– Module(s) that records coverage.target_module– Module of the target function.target_offset– Virtual offset of the function to be fuzzed from the start of the module;fuzz_iterations– Fuzzing iterations before restarting the exec of the program.call_convention– Specifying the calling convetion:sdtcall,cdecl, andthiscall.nargs– number of arguments the fuzzed function takes. Thethispointer (used in thethiscallcalling convention) is also considered an argument.
WARNING: We build 2 WinAFL right? Remember, use the correct version of AFL for the target you are looking to fuzz! Here we are going to use the 32 bits version!
Since our binary is meant to open and read from a text file, create a “in” folder and put a text file with a simple phrase as content.
Ok now let’s cd into WinAFL_32 build directory and run the following command:
afl-fuzz.exe -i in -o out -t 10000 -D C:\WinAFL\DynamoRIO\bin32 -- -fuzz_iterations 500 -coverage_module vulnerable_reader.exe -target_module vulnerable_reader.exe -target_offset 0x01060 -nargs 3 -call_convention thiscall -- vulnerable_reader.exe @@If everything went well, you should see this beauty appears:
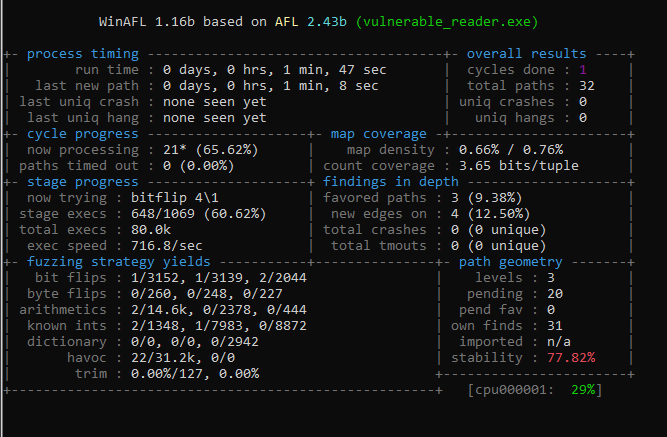
Now it’s a matter of time. Let the fuzzer run a few minutes then you should see the crash appears.
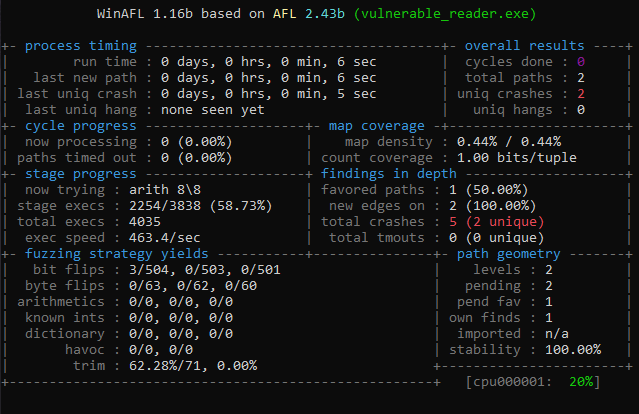
Analyze crash test
Here WinAFL found a crash really quickly. I designed on purpose a binary very simple to crash in order for this tutorial to be fun to do. As you can see, WinAFL names the crash file with the status and type of crash. You can find them in your out directory > crashes

It’s obviously a Stack BoF, since the program was purposely designed for that. However, let’s open it in WinDBG and do a root cause analysis of the crash.
Start WinDBG and click on File > Launch Executable (advanced) then put the path of the vulnerable binary as “Executable” and the crash_id file as “Arguments” then click on “Go” to run the program.

As you can see WinDBG is immediately screaming that a stack buffer overrun is detected. If you want to learn more about root cause analysis with WinDBG i suggest this nice video: https://hardik05.wordpress.com/2021/11/23/analyzing-and-finding-root-cause-of-a-vulnerability-with-time-travel-debugging-with-windbg-preview/
References
- WinAFL – https://github.com/googleprojectzero/winafl
- DynamoRIO – https://dynamorio.org/
- Syzygy – https://github.com/google/syzygy/wiki
- Intel PTrace – https://edc.intel.com/content/www/us/en/design/ipla/software-development-platforms/client/platforms/alder-lake-desktop/12th-generation-intel-core-processors-datasheet-volume-1-of-2/004/intel-processor-trace/
- ProcMon – learn.microsoft.com/en-us/sysinternals/downloads/procmon
- x64dbg – x64dbg.com/#start
- WinDBG – https://learn.microsoft.com/en-us/windows-hardware/drivers/debugger/debugger-download-tools
- Ghidra CheatSheet – https://ghidra-sre.org/CheatSheet.html
- Windows Internals – scorpiosoftware.net/category/windows-internals/
- Root Cause Analysis – https://hardik05.wordpress.com/2021/11/23/analyzing-and-finding-root-cause-of-a-vulnerability-with-time-travel-debugging-with-windbg-preview/